Mailchimp is one of the most popular Marketing Automation tools in the world. Most of the bigger brands use Mailchimp to engage with an audience and their customers. You might want to display Newsletter popup when the user visits your website for the first time. To implement this in website either you can hire a developer (like me ) or you can add it yourself just by following steps as explained below.

You must have your account in Mailchimp either free or premium based on your requirements. Log in to your account and go to lists as shown in above screenshot.
On the list page, click on the drop-down arrow just beside “Stats” which will open drop-down options for that list. Click on “Signup forms” which will redirect you to Signup Forms page as in below screenshot.

Mailchimp provides three types of signup form integrations:
- General Forms: Build, design and translate Newsletter Sign up forms and response emails.
- Embedded Forms: Generate code to embed in your website.
- Subscriber pop-up: Design a popup with Signup form that can be embedded in your website.
- Form Integrations: Create signup forms using third-party integrations like WUFOO and Squarespace.
Select “Subscriber pop-up” as we want to add Newsletter Signup form popup on the website. On selecting “Subscriber pop-up“, a popup will be opened as shown in below screenshot.
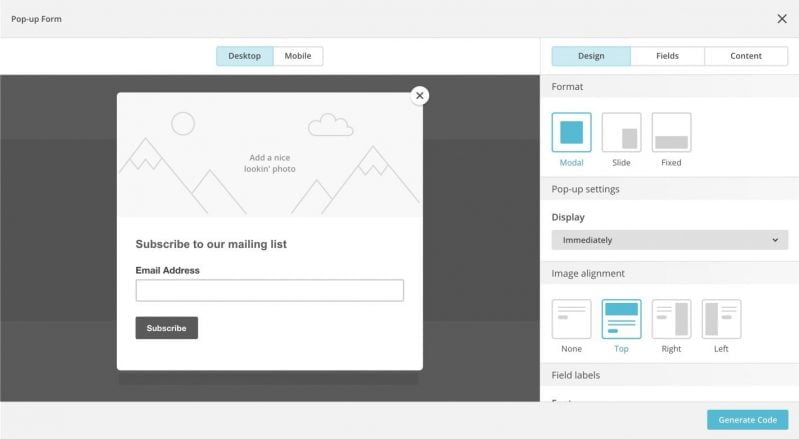
Design your signup popup here. Change format, text, time to display the popup, image alignment, field labels of Newsletter popup in “Design” tab on the right side. Changes done will be displayed in left side preview box. You can upload an image of the popup by clicking on “Add a nice lookin’ photo“.

Add/remove additional fields in your signup form as shown in above screenshot by selecting “Fields” tab. All available fields will be displayed with the checkbox which on selecting will display that field in Newsletter form. You can also enable required using toggle button on right side of the field.

Select “Content” tab to add content to the body section and footer section. After you have done all changes, you can click on blue button “Generate Code” on the bottom right corner to generate code which you can use to embed on your website.

You will see popup as in above screenshot. You can copy the code and embed the code in your website. Add code in header or footer of your website, so that it works for all pages of the website.

After adding code to your website, click on “Publish” button as shown in above screenshot. Mailchimp by default creates the responsive popup, you can view “Mobile” tab in preview section as shown in above screenshot.
Now, if you make changes in the popup in Mailchimp than it will automatically get rendered on your website. You don’t have to copy and paste the code again.
